I’ve talk about it a little on Facebook, but I’m not sure how many of my blog readers know this.
I am now officially Windows Champion Blogger for the next year.
What is that?
Well, basically in a nutshell… Windows is going to help me be a technology expert for you, my readers. I will be sharing little things here and there that I am learning. Things that help me blog, things that help me stay organized, things that help me stay in touch.
So for my first show and share, I wanted to tell you about Windows Live Writer.
WHY Windows Live Writer?
I’ve had several questions over the past few months about my blog posts. The questions range from how I have such large pictures with smaller picture sizes, to how I put in tables, to how I put frames (etc.) on my photos.
It’s not really a secret, but it seems to me that Windows Live Writer might be a unknown secret to a lot of bloggers.
I will try to go through the tabs and uses (that I use) as clearly as possible. This is in no way an attempt to be a “how to” … more of a “why you should use it” demo.
Windows Live Writer is a free download that allows you to write your blog posts offline (or online), edit and view what they are going to look like before you publish, and then you can upload everything (including photos) straight to the blog. If you only have a few minutes to work on the post, then save it to your hard drive for later editing. When you are ready to post online, you can chose to “publish” or just post it as a draft to your blog .
You don’t need to be an html expert, or know any for that matter. Type is on the “edit” page, click on the “preview tab”, and if you know some html that you’d like to tweak something with, click on the “source” tab to do that. If you like what you see… click publish and you’re done!
I’m not an expert at this program, but I’ve been using it for a year now to blog. I love the ease of use.
This is why…
The screen shot above is from the “Home” page. This is the main tab I work with. From here you can (from left to right):
-
paste from your clipboard
-
publish/post draft to your blog, choose your font type, style and accents (bold, italic, underline, strike through, font color etc.).
-
add bullet points, numbers or quotes
-
left justify, center, right justify, or justify your text &/or photos
-
choose your heading style (I haven’t played with this function (yet))
-
add a hyperlink, picture or video
-
check your spelling, word count, find a word or phrase or “select all”
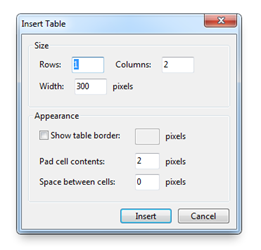
The second tab (shown above) is called the “insert” tab. I don’t actually work from this tab often… usually only to add a table or put a post break in (so you have a teaser on your front page and the reader clicks on “read more” to finish reading your post).
Tables allow you to center multiple columns in a uniform way, with or without lines. Just click on the table button, choose how many rows and columns you need and the width (which isn’t set in stone because you can manipulate them manually). Make sure to choose whether you want the table border to show or not and “insert”. My example has 3 rows and 2 columns. I chose not to show the border, but in edit mode you will see them. After uploading, the lines will be gone.
Although I don’t use the insert tab a lot, it is a valuable tool to help make your blog post look more professional and uncluttered when you have a lot of information to share.
The third tab is “blog account”. To be honest, I have never used this tab. I believe this tab is mainly to set your blog account information for logging in and publishing. Like I said… I’m not an expert.. just a Live Writer lover.
Here is the main reason I love Windows Live Writer.
Photos.
It’s quite simple really. I believe pictures speak louder than words. So wouldn’t larger pictures SHOUT! ? ![]()
Windows Live Writer lets you do so many things with your photos.
Crop, size, rotate, tilt, add/remove frames & effects (my favorite), watermark (you will see www.ourkidsmom.com on most of my photos) and so much more. Look at what I can do with just the framing option!
You can do all this from the same program and never leave your blog post. Move, size, resize, delete, add more… all with a few clicks of the mouse.
This is just a teaser about why I love Windows Live Writer. Find out more visit the website here.
Disclosure: I am a Windows Champion blogger and I received loan of laptop and may receive other awards from Microsoft to post my opinion about Microsoft products.


Love windows writer 🙂 My blog posts would look like crud without it!
I’m unfamiliar with this program – does Live Writer post directly to WordPress? Interesting article, thanks for sharing!
Never mind, I see you already explained that! Sorry, it’s Friday and this coffee has not kicked in yet! 😉
ooo, helpful! i have never done this before